The Java Virtual Machine heap size is largely related to the performance and possible cache size for the Principal Toolbox application. Depending on the expected use and available system resources, the JVM configuration needs to be modified. Review the table below to determine a suitable configuration.
| JVM Configuration (max memory) | Advised Cache Size | Remarks |
| 256 MB | XS | Minimal configuration for general use. |
| 512 MB | S | Recommended configuration for general use. |
| 1024 MB | M | Suitable for general use and recommended if application needs to support multiple large projects (200 products and more). |
| 1350 MB | L | Suitable for larger organisations and limited amount of projects (max. 200 projects). |
| 2048 MB | XL | Suitable for large organisations and many projects. Option for optimal performance. |
| 4096 MB or more | XXL | Option for even more performance. |
Important: On 32-bit operating systems you can set the maximum amount of memory only up to 1350 MB.
To configure the needed JVM heap size, there are two options:
A. In the Tomcat service wrapper configuration (used by the standard Principal Toolbox installer)
B. In the Tomcat properties dialog (using a default Tomcat installation)
C. In the Windows Registry (using a custom JVM)
A. In the Tomcat service wrapper configuration
When a Principal Toolbox application is installed with the Principal Toolbox installer, you can make use of this paragraph. Otherwise there will be no wrapper.conf file available to modify and the next paragraphs should be applied to make changes using the Apache Tomcat properties or in the Windows Registry.
| 1. | Open the wrapper.conf file in a text editor. The file can be found in the \Tomcat\conf directory. |

| 2. | Find the section where the maximum Java heap size is specified. Uncomment the line wrapper.java.maxmemory=.. by removing the # in front. |

| 3. | Give an amount of memory available for Java. In this example there will be a maximum of 1024 MB available for the Java Virtual Machine. |

Note: The value is specified in megabyte (MB) of memory.
| 4. | Check in the Principal Toolbox if the new memory size is available for the Java Virtual Machine. |
When these changes doesn’t affect the JVM Heapsize value, you have to follow the steps described in the options A. or C.
B. In the Tomcat properties dialog
Follow these steps when the Principal Toolbox runs on a custom installed Apache Tomcat server.When following these paragraph and nothing changes after editing the memory pool in the Apache Tomcat Properties, use the next paragraph to change the Windows registry.
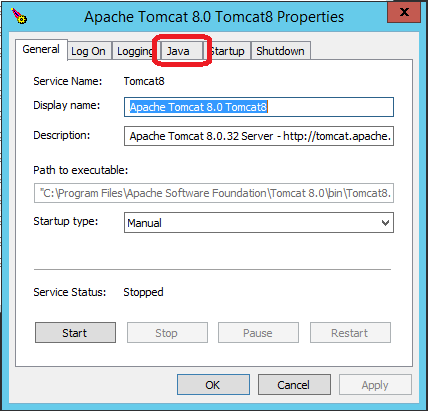
| 1. | Open the Apache Tomcat Properties. |

| 2. | Browse the Java tab. |
| 3. | Give an amount of memory available for Java. In this example there will be a maximum of 2048MB available for the Java Virtual Machine. |
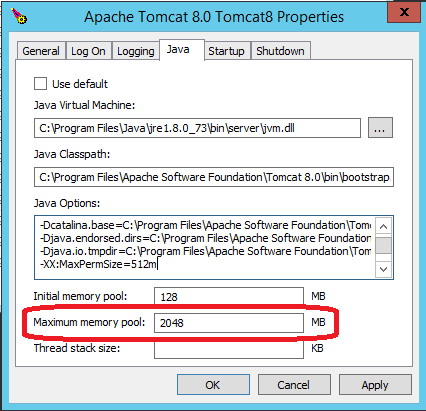
Note: The value is specified in megabyte (MB) of memory.
| 4. | Click OK to save the changes and restart the Tomcat service, which can be done on the General tab. |
| 5. | Check in the Principal Toolbox if the new memory size is available for the Java Virtual Machine. |
When these changes doesn’t affect the JVM Heapsize value, you have to follow the steps described in the options A. or C.
C. In the Windows Registry
Follow these instructions when the Principal Toolbox installer wasn’t used by the installation of the Principal Toolbox. Changing these settings in the Windows registry won’t affect the amount of memory available for the Java Virtual Machine, when the Principal Toolbox installer was used during installation.
| 1. | Open the Windows Registry Editor and navigate to HKEY_LOCAL_MACHINE\SOFTWARE\Apache Software Foundation\Procrun 2.0\[Tomcat service name]\Parameters\Java. |

| 2. | Double click the JvmMx registry key. A pop-up is opened where you can give a value of data. |

| 3. | On the right side of this window, set the base to Decimal. Now you can set a value of the maximum amount of memory in the value data field. In this example there will be 2 GB available for the Java Virtual Machine. |

Note: The value is specified in megabyte (MB) of memory.
| 4. | Click OK to save the changes and verify if the changes are applied. |

| 5. | Restart the Tomcat server to apply the new settings. |
| 6. | Check in the Principal Toolbox if the new memory size is available for the Java Virtual Machine. |
When these changes doesn’t affect the JVM Heapsize value, you have to follow the steps described in the options A. or B.
