General
This information was extracted from the original post on: How To Configure IIS 7.0 and Tomcat with the JK 1.2 Connector. For more information and troubleshooting please look at that post.
For this instruction, you will need the Jakarta ISAPI connector and configuration files as attached to this topic (see below).
Instructions
When you got the Principal Toolbox working we need to configure the JK 1.2 Connector which will allow IIS to effectively act as a proxy and forward requests on to Tomcat (Principal Toolbox). Start by creating a folder called ‘isapi’ under the Tomcat root folder. Then copy the files from the ISAPI connector (as attached to this topic) into the ‘isapi’ folder as shown here.

In order to configure the Tomcat connector you need to modify and import the registry file. Open the ISAPI.reg file in notepad and adjust paths according to your installation:

Please make sure that every ‘\’ is doubled in this registry file.
Double click the registry file to import these settings in the registry on the server.
We also need to check the two Tomcat connector configuration files (workers.properties and uriworkermap.properties) so that the connector knows how to handle the requests it receives. These configuration files are documented on the Tomcat web site here : The Apache Tomcat Connector – Reference Guide


Next, make sure that IIS has the following optional components installed:
- .NET Extensibility
- CGI
- ISAPI Extensions
- ISAPI Filters
- Windows Authentication
The last option is advised as IIS is mostly used to configure Single Sign-On.

Now we need to configure IIS. Start by creating a virtual directory and give it an alias of ‘Jakarta’ as shown here. Incidentally, you don’t have to call the virtual directory ‘Jakarta’ – you can actually give it any name you like, just so long as the name you choose appears in the extension_uri line of your isapi_redirect.properties file.
Next we need to configure the virtual directory to have execute permission. This was a simple tick-box option in IIS 6.0 but in IIS 7.0 we need to click on the Jakarta virtual directory and then double-click Handler Mappings.
Within the Handler Mappings feature click Edit Feature Permissions in the Actions Pane.
Click Execute in the Edit Feature Permissions dialog box and click OK.
In the Handler Mappings feature you can now see that calls to ISAPI-dll files are enabled.
The next step is to add an ISAPI filter on the web site. To do this click on the web site and then double-click the ISAPI Filters feature.
In the Actions pane click Add.
In the Add ISAPI Filter dialog box enter a name and the path to the isapi_redirect.dll file and click OK.
The Tomcat ISAPI filter should now appear in the ISAPI Filters list as shown here.
The final step we need to take is to configure the ISAPI and CGI Restrictions feature in IIS 7.0. This is analogous to adding or allowing a Web Service Extension in IIS 6.0. In IIS Manager navigate to the Server Home and then double-click on the ISAPI and CGI Restrictions feature.
In the ISAPI and CGI Restrictions feature click Add on the Actions pane.
In the Add ISAPI or CGI Restriction dialog box enter a name and the path to the isapi_redirect.dll file, tick the Allow extension path to execute option and click OK.
The Tomcat ISAPI extension should now appear in the list with a Restriction status of allowed as shown here.
Everything we need to configure is now in place and we are ready to test. Type the url in your browser: http://localhost/Principal .
Performance problem after connecting to IIS?
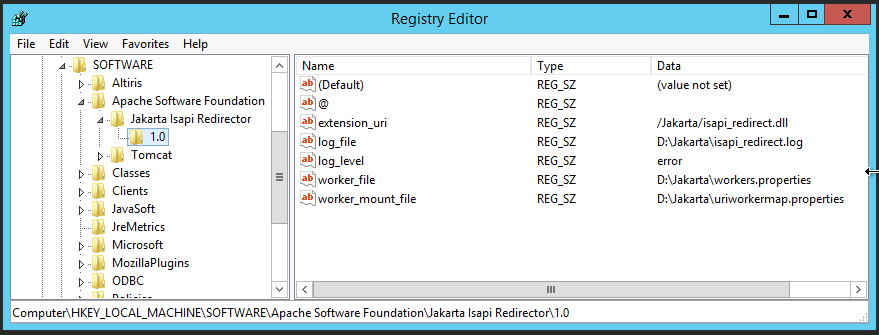
Try to set the log level on error only instead of debug mode:
[HKEY_LOCAL_MACHINE\SOFTWARE\Apache Software Foundation\Jakarta Isapi Redirector\1.0]
“@”=””
“server_root”=”D:\\Jakarta\\
“extension_uri”=”/Jakarta/isapi_redirect.dll”
“log_file”=”D:\\Jakarta\\isapi_redirect.log”
“log_level”=”error”
“worker_file”=”D:\\Jakarta\\workers.properties”
“worker_mount_file”=”D:\\Jakarta\\uriworkermap.properties”


