PI Roadmap
Introduction
What is the PI Roadmap?
The PI Roadmap gives you a program-level view that looks further ahead than a single increment: which team delivers which feature, and in which Planning Interval (PI). By defining team velocity, assigning story points, and connecting backlog items, the roadmap answers three questions at a glance: who (team) delivers what (feature) when (PI).
Who uses it?
- Program managers: to plan features across increments and track overall delivery progress.
- ART facilitators: to coordinate team capacity and increment planning.
- Team managers: to review team load and velocity per increment.
- Portfolio managers: to understand when epics are forecasted to complete.
What value does it deliver?
- A clear timeline view of which features are planned in which increment and by which team.
- Visual velocity indicators that make overcommitment immediately visible.
- Explicit dependency management between features with color-coded conflict signals.
- A direct link between portfolio epics and program-level delivery so strategic progress is always traceable.
How to set up the PI roadmap
Creating increments
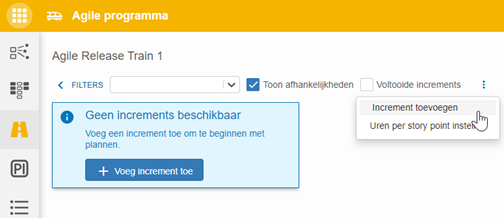
Start by creating increments in the roadmap. Each increment has a name, number, timeframe, and can include a set of sprints. Increments typically align with your PI cadence (e.g., a quarter). Once created, increments appear as containers where features can be scheduled.
- Open the PI Roadmap module.
- Create a new increment by clicking Add Increment (click the
⋮menu first if an increment already exists). - Add a name (e.g., PI 2025-01).
- Define the timeframe (start and end dates).
- Repeat for all increments in your planning horizon.
Add teams from Jira or Azure DevOps
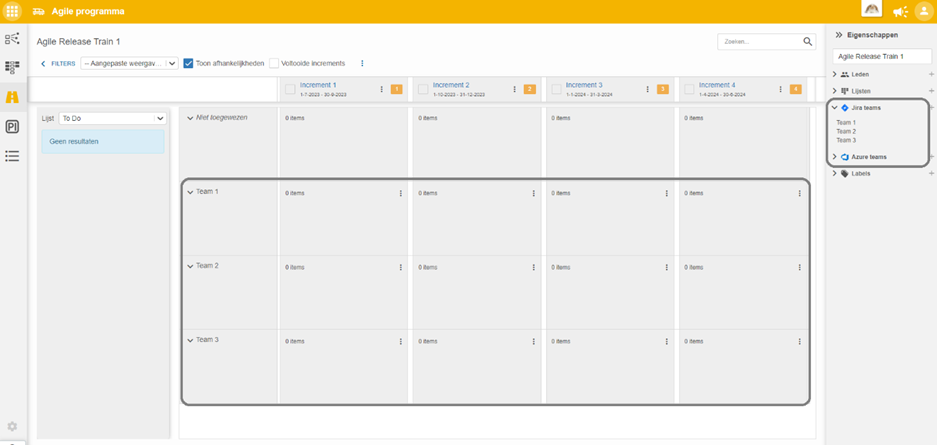
Teams connected through Jira or Azure DevOps can be added directly to the Agile Program. These teams then become visible in the roadmap grid. Adding teams ensures capacity is calculated correctly and features can be assigned to the right delivery groups. More information on connecting Jira or Azure DevOps can be found in Jira Connectivity or Azure DevOps Connectivity.
Select program items from the backlog
On the left side of the PI Roadmap, select the backlog of program items to schedule. These items can be created beforehand on the Portfolio items breakdown tab or the Kanban tab. Once selected, they are available to drag into increments.
Set a velocity per team
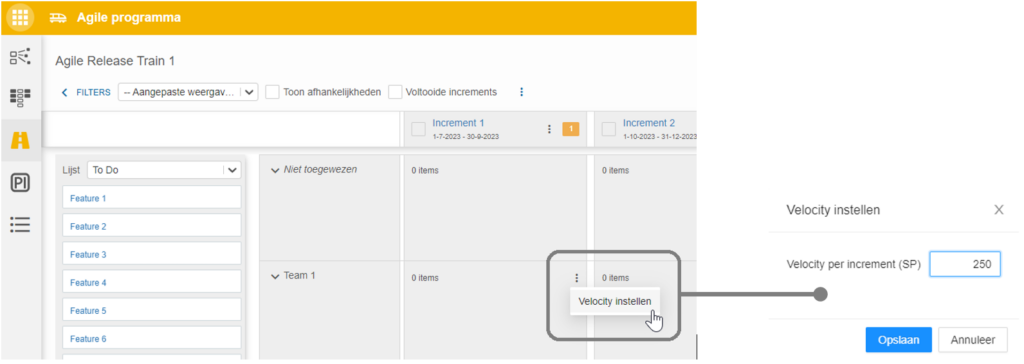
For each increment, assign a velocity to every team. Velocity represents the number of story points a team can complete during an increment. By default, new increments adopt the velocity from the previous one, but it can be adjusted if needed. This ensures that planned work matches team capacity.
Add story points to an item
Each program item can be assigned a number of story points. Underwater, the velocity per increment and story points per feature are stored as booking lines in hours.
How to use the PI Roadmap
Once the setup is complete, you can begin planning features. Drag items from the backlog into the appropriate increment and team row. Features can also be left in the Unassigned row if the target team is not yet known.
Progress overview
The portfolio-items (Epics) are displayed at the top of the roadmap. They are automatically placed in the last increment in which one of their linked features is scheduled. This makes it easy to see when an epic is forecasted to be completed. Collapsing the epic view helps focus on specific increments when needed.
Note: The portfolio-item only appears when all sub-items are planned.
Indicators
The roadmap provides built-in indicators to improve planning quality:
Relative sizes of features
- Each feature displays a blue bar representing its size in story points compared to other features in the roadmap.
- The feature with the highest number of story points shows a completely filled bar.
- All other features are scaled proportionally relative to that largest feature.
Velocity vs. planned story points per team per increment
- When a team has a defined velocity and at least one feature planned, an additional indicator is shown.
- A black marker represents the team’s velocity.
- For the team with the highest velocity, this marker is positioned at 80% of the bar.
- For other teams, the marker shifts left or right depending on their relative velocity.
- A blue bar shows the total story points planned for that team in the increment.
- If the total planned points exceed the velocity, the excess is highlighted in red.
- Overruns greater than 20% are displayed in dark red, signaling a significant overload.
These visual cues make it clear when adjustments are needed to balance work across increments.
Dependencies
Dependencies between features can be created by linking items directly on the roadmap. This is done by clicking the button at the top right of a feature. Then you make the dependency by clicking the same button on another feature. A line is drawn between dependent features:
- Green indicates the dependency is feasible within the current schedule.
- Red signals a conflict, such as when a required feature is scheduled later than its dependent one.
Removing a dependency can be done by clicking on the button at the top right from where the dependency is laid. A trash can appears at the line. Clicking on this will remove the dependency.
In the PI roadmap, you can choose to show or not show dependencies. By unchecking the checkbox, the dependencies remain, but are not shown. At that point, you can’t create new dependencies either.
Finish increment
An increment is complete when all associated sprint are complete. At that point, the ‘Completed’ checkbox is automatically filled in. Sprints can be set to complete on the PI planning tab. On the PI roadmap tab, you can then choose to show or not show completed increments. Removing the check mark will not show completed increments.
Need more support?
For step-by-step instructions or troubleshooting, contact your Fortes Change Cloud administrator or consult in-app help.