Resource allocation
Introduction
What is the tab?
The Resource Allocation tab lets you plan, request, and view hours or man days for project work. It shows time-phased demand versus capacity by skills, teams, or named resources, so you can align staffing with your plan.
Who uses it?
- Project managers create demand and send requests to supplying teams/resource pools.
- Team/resource managers allocate hours (in the Start app) and resolve conflicts.
- Team members may view their own allocations, depending on permissions.
What value does it deliver?
- A single place to coordinate staffing across projects.
- Transparent request → allocation workflow with weekly visibility.
- Early warning for over-allocation and easy rebalancing.
Access without an admin role
Under Manage resources, an administrator decides which users may add or modify resources.
- Go to Manage resources.
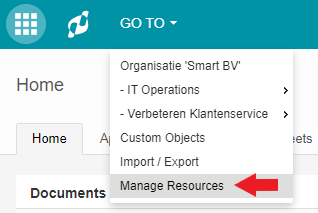
- Add these users via Edit roles.

- These selected users can set skills and rates for resources.
- Other settings (changing account info or adding resources without an account) remain for system administrators only.
What is the goal of the Resource Allocation tab?
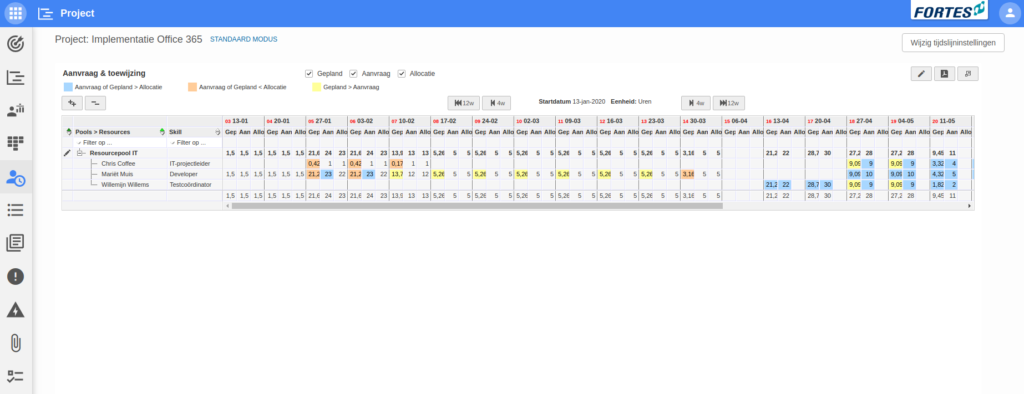
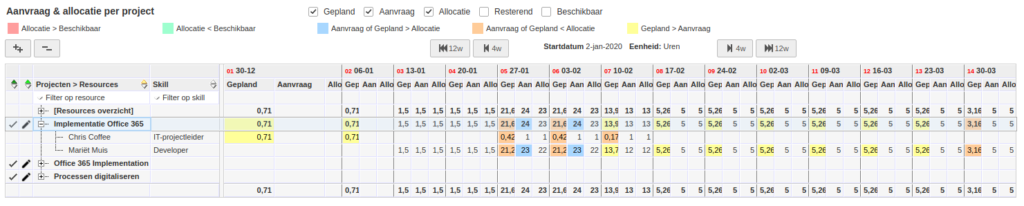
- Show Planned / Requested / Allocated per week for your project.
- Enable the project manager to request hours based on the plan.
- Make clear how many hours the resource manager has allocated.
Color cues indicate when more or fewer hours are planned than requested.
Timeline settings (Edit timeline settings)
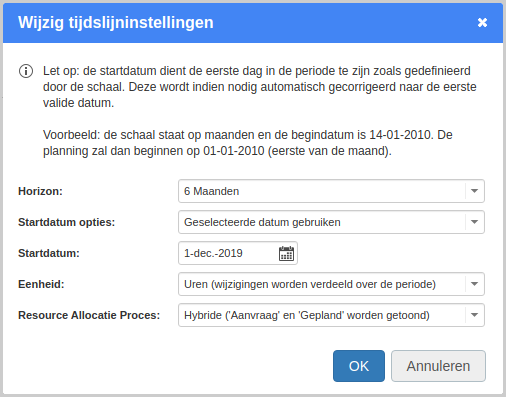
Click Edit timeline settings to adjust the overview:
- Horizon – choose the period shown on the timeline.
- Start date options – start at Current date or a Selected date.
- Unit – choose Hours (changes are spread out over period), Man days (spread), or Days per working week (hours per working day × 5/8).
- Resource allocation process – Project request driven (“Requested”), Project demand driven (“Planned”), or Hybrid (both shown).
You can also export the overview to PDF via the button at the top right.
How do I use the Resource Allocation tab?
- Edit the settings so they fit how your organization works (see Timeline settings above).
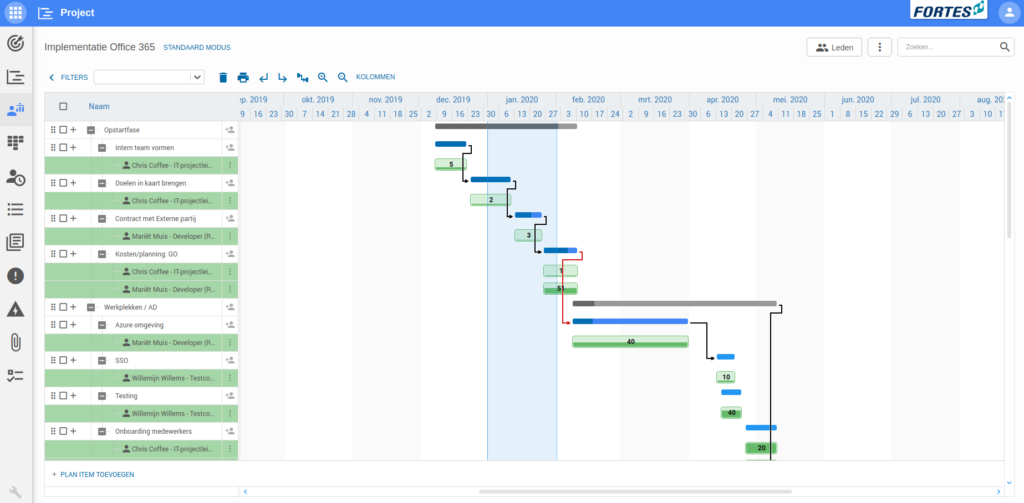
- Plan resources in the resource planning. The Planned column on the tab is filled from the resource planning (in hours, man days, or days per working week).
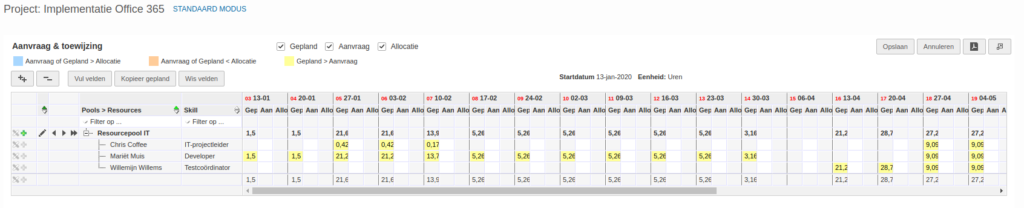
- Request hours on the Resource Allocation tab: click Edit and fill the Requested column per resource/week.

- Check allocations after the resource manager has allocated. Allocations become visible on this tab and can be downloaded as a PDF.

How are hours planned, requested and allocated?
Planned (on the project)
The tab uses the resource planning to determine planned hours. When you plan 40 hours on a four-week item, the tab shows 10 hours per week for 4 weeks. If the same resource is scheduled on overlapping items, the planned hours are added.
Requested (on the project)
Click Edit and enter the hours in the Requested column. These requested hours are visible to the resource manager; using the Planned column as a guide is recommended.
Allocated (in the Start app)
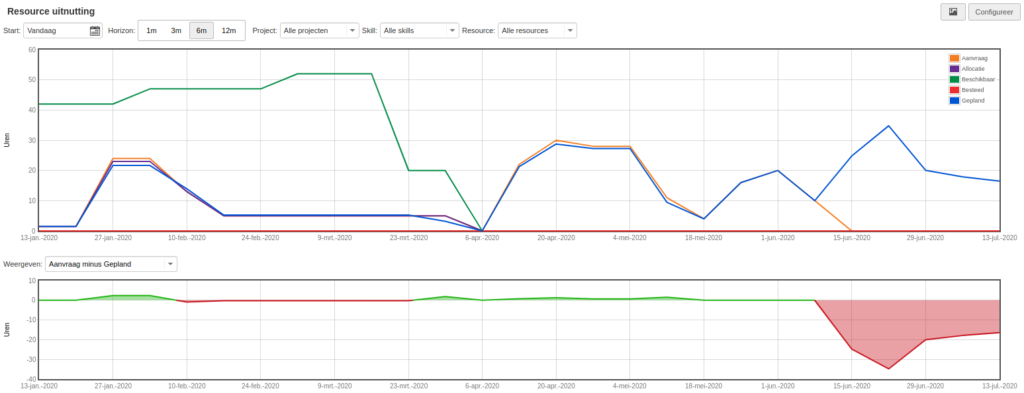
The resource manager allocates hours to a project in the Resource management tab in the resource pool in the Start app. Here, the availability of resources from this resource pool can be found and edited, and the the resource manager can allocate resources to a project. The resource manager is also supplied with graphs that inform them about the resources. When the resource manager has assigned resources to a project, it becomes visible in the resource allocation tab in the project.
Best practices
- Plan by skill first, allocate to names later to keep early planning flexible.
- Batch requests (e.g., per milestone) to reduce churn.
- Agree on units across teams (hours vs. man days) and stick to them.
- Avoid micro-planning far out—plan monthly there, refine weekly only for the near term.
- Review over-allocations weekly and rebalance early.
- Document assumptions (ramp-up, holidays) in project notes.
FAQ
Do I need an admin role to request/allocate?
No. Project managers request; team/resource managers allocate (in the Start app). Admins configure defaults and permissions.
Why are my numbers different after switching units?
Internally values are hours. Man days convert using the portfolio/team setting (e.g., 1 MD = 8 h).
Can I allocate to a team instead of names?
Yes—if configured. You can plan/request by team and let the manager map to names later.
What if a resource is over-allocated?
Find the conflict weeks with filters/time scale, then re-assign, move part of the demand, or request extra capacity.
Can I withdraw or change a request?
Yes—edit the demand and re-send; the supplier can update allocations accordingly.
How does this relate to the Project Gantt?
The Gantt manages schedule and scope; Resource Allocation ensures capacity. After big schedule changes, revisit requests/allocations.
Need more support?
Contact your Fortes Change Cloud administrator or consult the online knowledge base for more step-by-step configuration guides.
TODO: translate this document (user-docs/projects/resource-allocation.md).
Source: C:\Users\MilanOzinga\Development\fcc\knowledge-base\docs\user-docs\project\resource-allocation.md