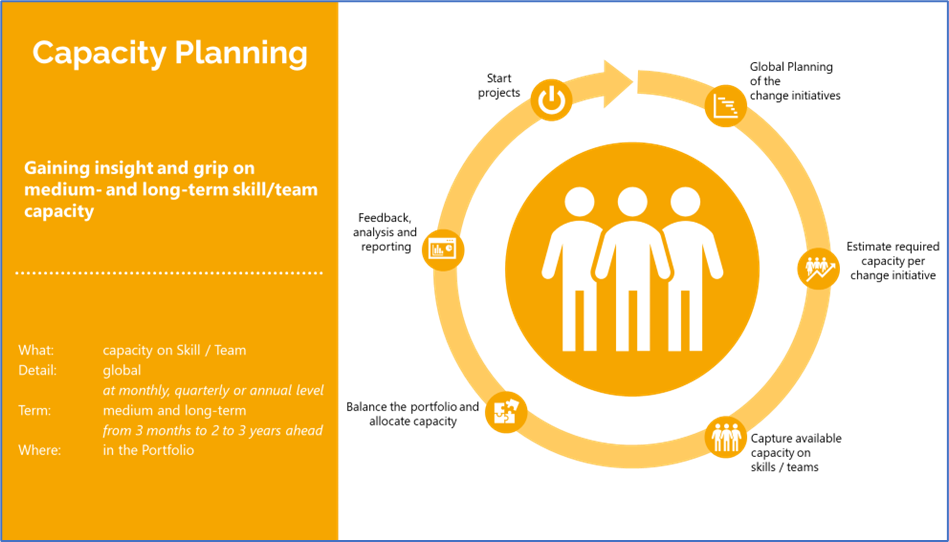
Figure: Process for Capacity Planning.
Planning period Capacity Planning: 3 months – 3 years ahead (medium and long term)
If you want insight into capacity far ahead (years), then do it from the Portfolio and by skills/teams (not individuals). You look at capacity based on global planning of portfolio items and rough estimation of hours.
This approach helps e.g. in preparing annual plans and making analyses about possibility of picking up certain changes in the coming years. In doing so, this prevents starting too many projects in advance without (roughly) sufficient capacity. Because starting projects has to do with prioritization, the discussion on this should also be conducted from the Portfolio. Overall long-term understanding of availability of skills/teams is essential here.

Overall planning of change initiatives.
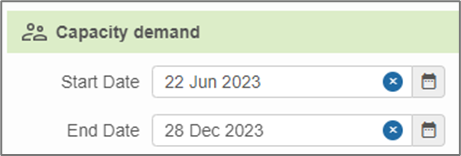
Change initiatives are created in the Portfolio. For each change initiative, indicate when it is expected to be implemented. This is necessary to determine in the follow-up steps during which period what deployment of capacity is expected.
Where: in the Portfolio
How: There are two places where this can be done:
1. Gantt chart of the Portfolio.
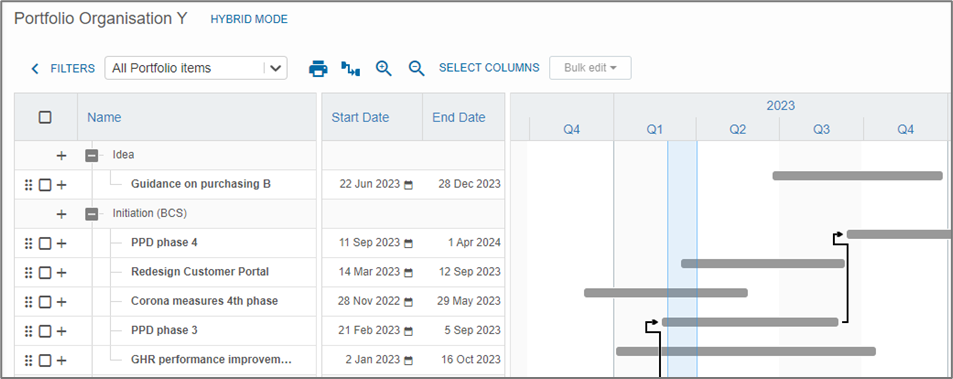
2. Map (the Canvas) of the change initiative:
Notice:
Only the planning of change initiatives not started can be adjusted. If a change initiative is started as a project, then the project planning is leading.
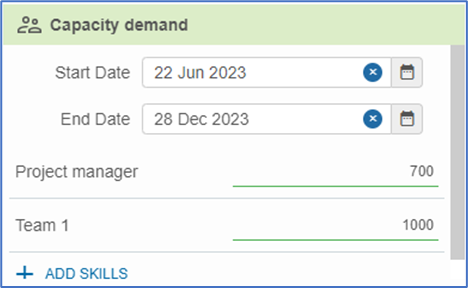
Estimate capacity needed per change initiative
For each change initiative, the estimated effort (in hours) per skill can be indicated. This rough estimate of capacity is divided proportionally between the start and end dates of the change initiative.
Where:
In the ‘canvas’ of the change initiative in the Portfolio
How:
- Open the change initiative canvas
- Add any skills/teams: press ‘+ ADD SKILLS’
(Whether this can be done depends on the configuration of this segment) - For each skill, enter the estimated number of hours required

Capture available capacity skill
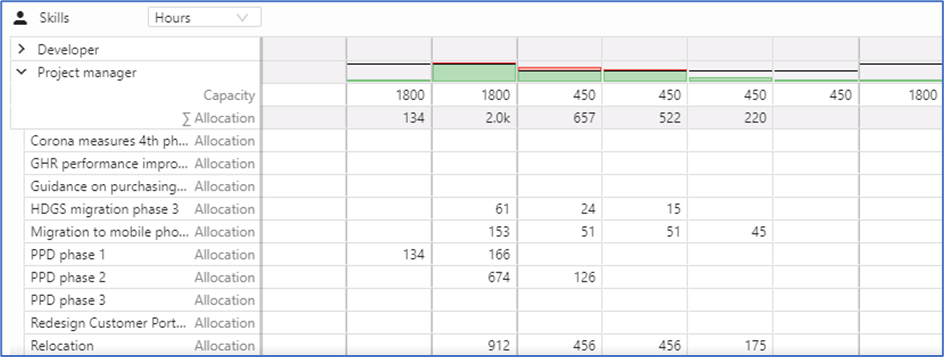
To visualize bottlenecks in capacity planning, the required capacity is measured against the available capacity. For each skill you can indicate how many hours or FTE are available when.
Where: In the Portfolio the “Resource planning by skill” tab.
How:
In the Portfolio, open the Resource Planning by Skill tab. The screen that opens consists of two parts:
a. Top: estimated/planned/requested capacity by change initiative by skill
b. Bottom: available and total allocated capacity per skill
Determine whether you want to specify capacity in FTE or Hours:
Open the drop-down menu above the lower part of the screen and make the selection.

Determine the time unit to enter data
At the top of the bar, the time unit per year can be indicated in years, quarters or years.

Enter the available capacity per skill
In the lower part of the screen, the skill where you want to enter the available capacity can be ‘clicked open’: click on ‘>’ icon for the skill.
In the ‘Capacity’ line that then appears, the available capacity can be entered.


Balance portfolio and alloce capacity
If previous steps have been completed, then the portfolio contains change initiatives with a rough estimate of hours per skill. In doing so, the change initiatives are planned over time. This gives an idea of how much capacity per skill per period is expected.
By contrasting this picture of available capacity with expected capacity (supply and demand), bottlenecks become apparent.
However, you also have to take into account ongoing projects that have already been allocated capacity. In ongoing projects, the initial rough estimate is often no longer what you are looking at. You then base balancing on the already allocated capacity or the currently planned capacity of the project.
Where: In the Portfolio the “Resource planning by skill” tab.
How: At the bottom of the screen, the availability per skill is always compared to the already allocated capacity of that skill on the change initiatives. By converting the rough estimate of a change initiative into an allocation, you add that change initiative to the comparison view. Then you can see if that is still possible within the available capacity.
Copy rough estimate to Allocation
Put the correct type of hours next to each other: you do this at the top of the screen

Hover over the change initiative whose “Rough Estimate” you want to convert to “Allocation. An icon with 3 dots appears behind the name of the change initiative. Click on that icon: a pop-up appears saying “Copy Rough Estimate to Allocation.

Click on this text to copy the “Rough Estimate” into an “Allocation.
The allocation on that change initiative now becomes visible in the lower part of the screen where it is plotted against the availability of the skills along with the other allocations.
Make, delete or save changes as Scenarios
Once a change is made, the following buttons appear in the upper right corner of the screen:

- Apply changes: the changes made are applied.
- Delete changes: all changes not yet applied are deleted.
- Save changes as a scenario: the changes made are saved as a scenario. You can name the scenario. This scenario can be retrieved, compared and applied later.
Scenarios
Saved scenarios can be recalled. To do this, put the screen in scenario mode. This by the slider in the upper right corner.

The next line of options will then appear:

You can recall saved scenarios by choosing them from the pull-down:
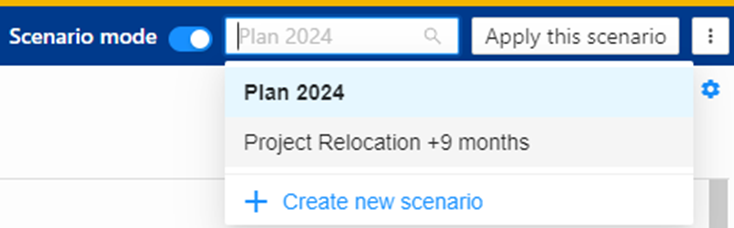
You can apply a scenario by clicking the “Apply this scenario” button.
Note: saved changes in scenarios are relative to the current situation. That is, the delta relative to actuality is stored in a scenario.
E.g. a skill has currently been allocated 100 hours.
- In a scenario, this is increased to 120 hours à this is stored as +20 hours (difference between actual 100 hours and scenario 120 hours).
- The current situation, for whatever reason, changes to 150 hours of allocation à when then looking at the scenario, there is an allocation of that current 150 hours + 20 hours from the scenario = 170 hours.
Balancing capacity
If it turns out that there is insufficient capacity, for example, you can try to find a solution for this.
These changes can be saved as a scenario or applied immediately.
You have several options:
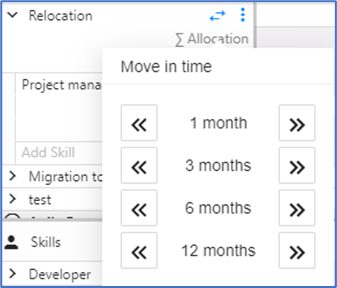
Shifting a change initiative
Clicking on the arrows behind the name of a change initiative brings up a pop-up that allows you to move that initiative.
By dragging a change initiative with the mouse via the blue planning bar.
Adjust availability
Adjust the availability of a skill in a given period. This by entering it in the lower part of the screen.
Adjust Allocation
In the upper part of the screen, the Allocation per skill can be adjusted per period.

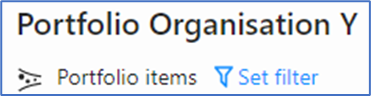
Feedback, analysis and reporting
Changes in Capacity Planning can be saved as a scenario. By using filtering the changes can be made transparent. These changes can be discussed with the various bodies (Project leader(s), Management, Portfolio Board, etc.).
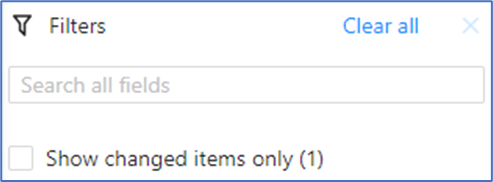
To do so, in the “Capacity Planning by Skills” screen, click “Set Filter.
If there are changes then a check box will become visible: ‘Show only changed items’.
Select this so that only the changes are visible.
Once a changes are approved they can be implemented by clicking on ‘Apply changes’ (top right corner of the screen).


